
Sitecore Docker Headless Installation
Prerequisites:
- Ensure latest Node JS is installed
- VPN can be ON or OFF during Angular JSS setup
- Proxy should be OFF
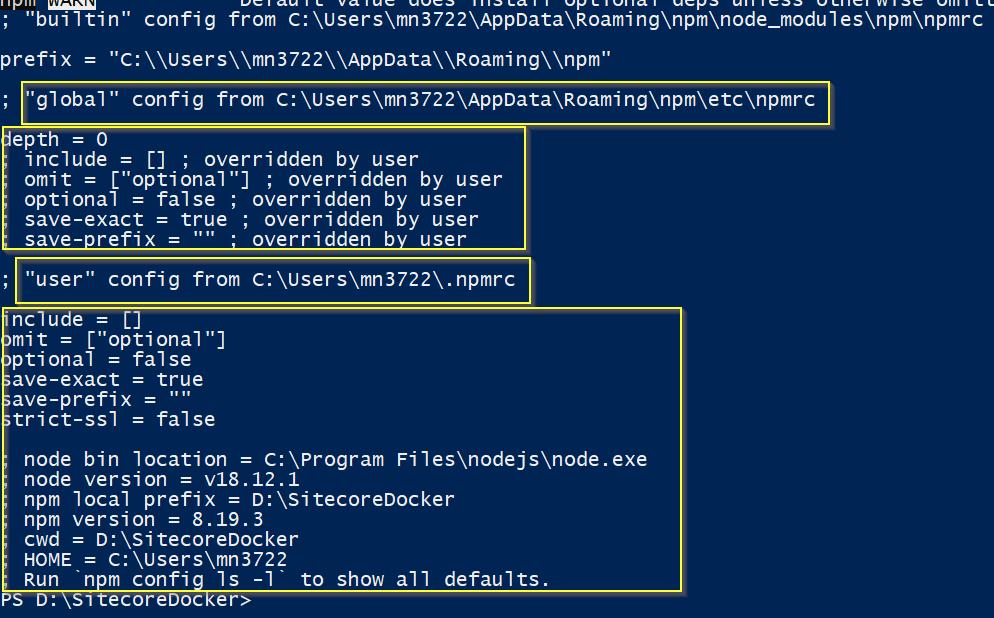
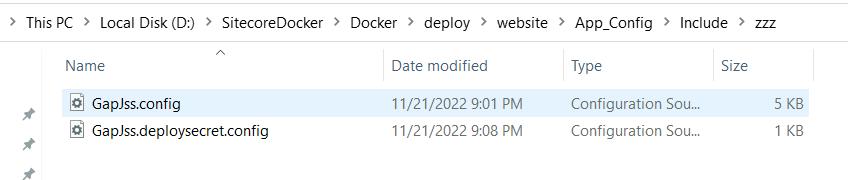
- Execute npm config list command.
- It should not show any proxy values as in the snapshot below
- If it shows proxy values, then execute and verify–
npm config delete proxy –global
npm cache clear –force
npm cache verify
npm config ls -l
Setup:
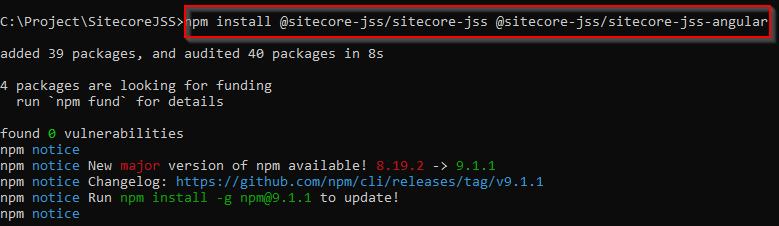
- Install Sitecore JSS CLI andAngular SDK CLI globally
- Create a folder for Angular JSS App e.g., C:\Project\SitecoreJSS\testapp
- Open a Command Prompt windowor from Visual Studio Code open a Command Prompt Terminal and go to the folder C:\Project\SitecoreJSS\testapp
- Execute to install Sitecore JSS CLI and Sitecore JSS Angular SDK CLI – npm install -g @sitecore-jss/sitecore-jss @sitecore-jss/sitecore-jss-angular
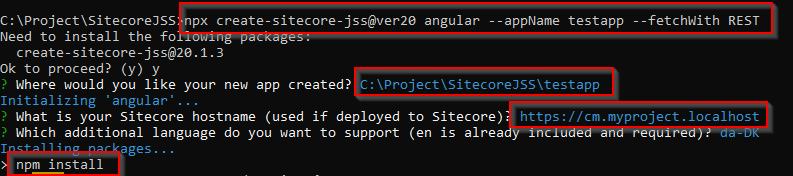
- Execute to create an Angular JSS app– npx create-sitecore-jss@ver20 angular –appName testapp –fetchWith REST
- When prompted
- provide the path where app needs to be installed and
- Sitecore host name (CM site URL)
- When prompted
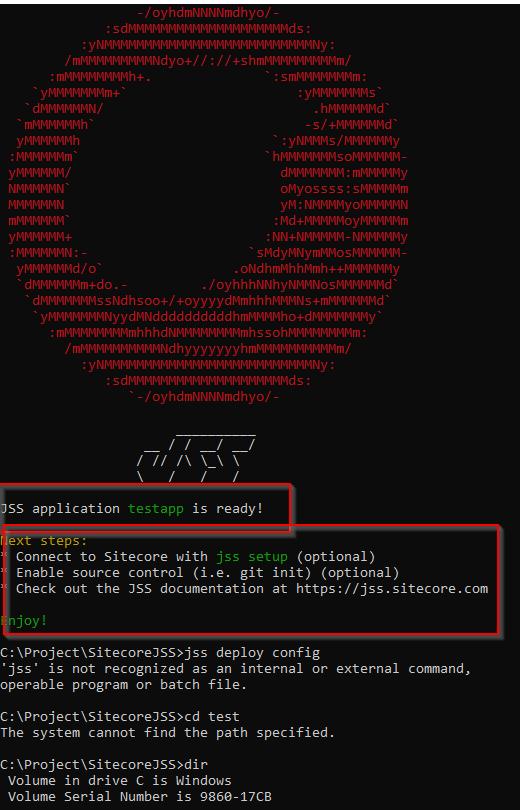
- On successful creation you will get this snapshot and next step to perform instructions
- Run JSS setup command to setup the connection between JSS Angular App with Sitecore instance
- Execute
- Jss setupcommand
- When prompted providehighlighted answers
- Say yesto whether Sitecore is accessible via a path
- Sitecore deploy folder– this is the folder which is used to deploy Sitecore to the docker container D:\SitecoreDocker\Docker\deploy\website
- Sitecore host name: https://cm.groupadminportal.local
- Impot service URL: https://cm.groupadminportal.local /sitecore/api/jss/import
- Sitecore API key: the key generated, published in the cm site at /sitecore/system/Settings/Services/API Keys. For me it was 3D4CE315-1BC1-4D27-B053-79C0ADA66F23
- Execute
- Above command (jss setup) creates 3 files
- json– it saves the following info –
"instancePath",
"apiKey",
"deploySecret",
"deployUrl",
"layoutServiceHost
- sitecore\config\config– save the website patch info for the new JSS site which will be created in Sitecore
- sitecore\config\deploysecret.config– it saves the deploy secret it generated with above command
- Execute command – jss deploy config
- This command deploys the above 3 files to the watch folder and into the docker
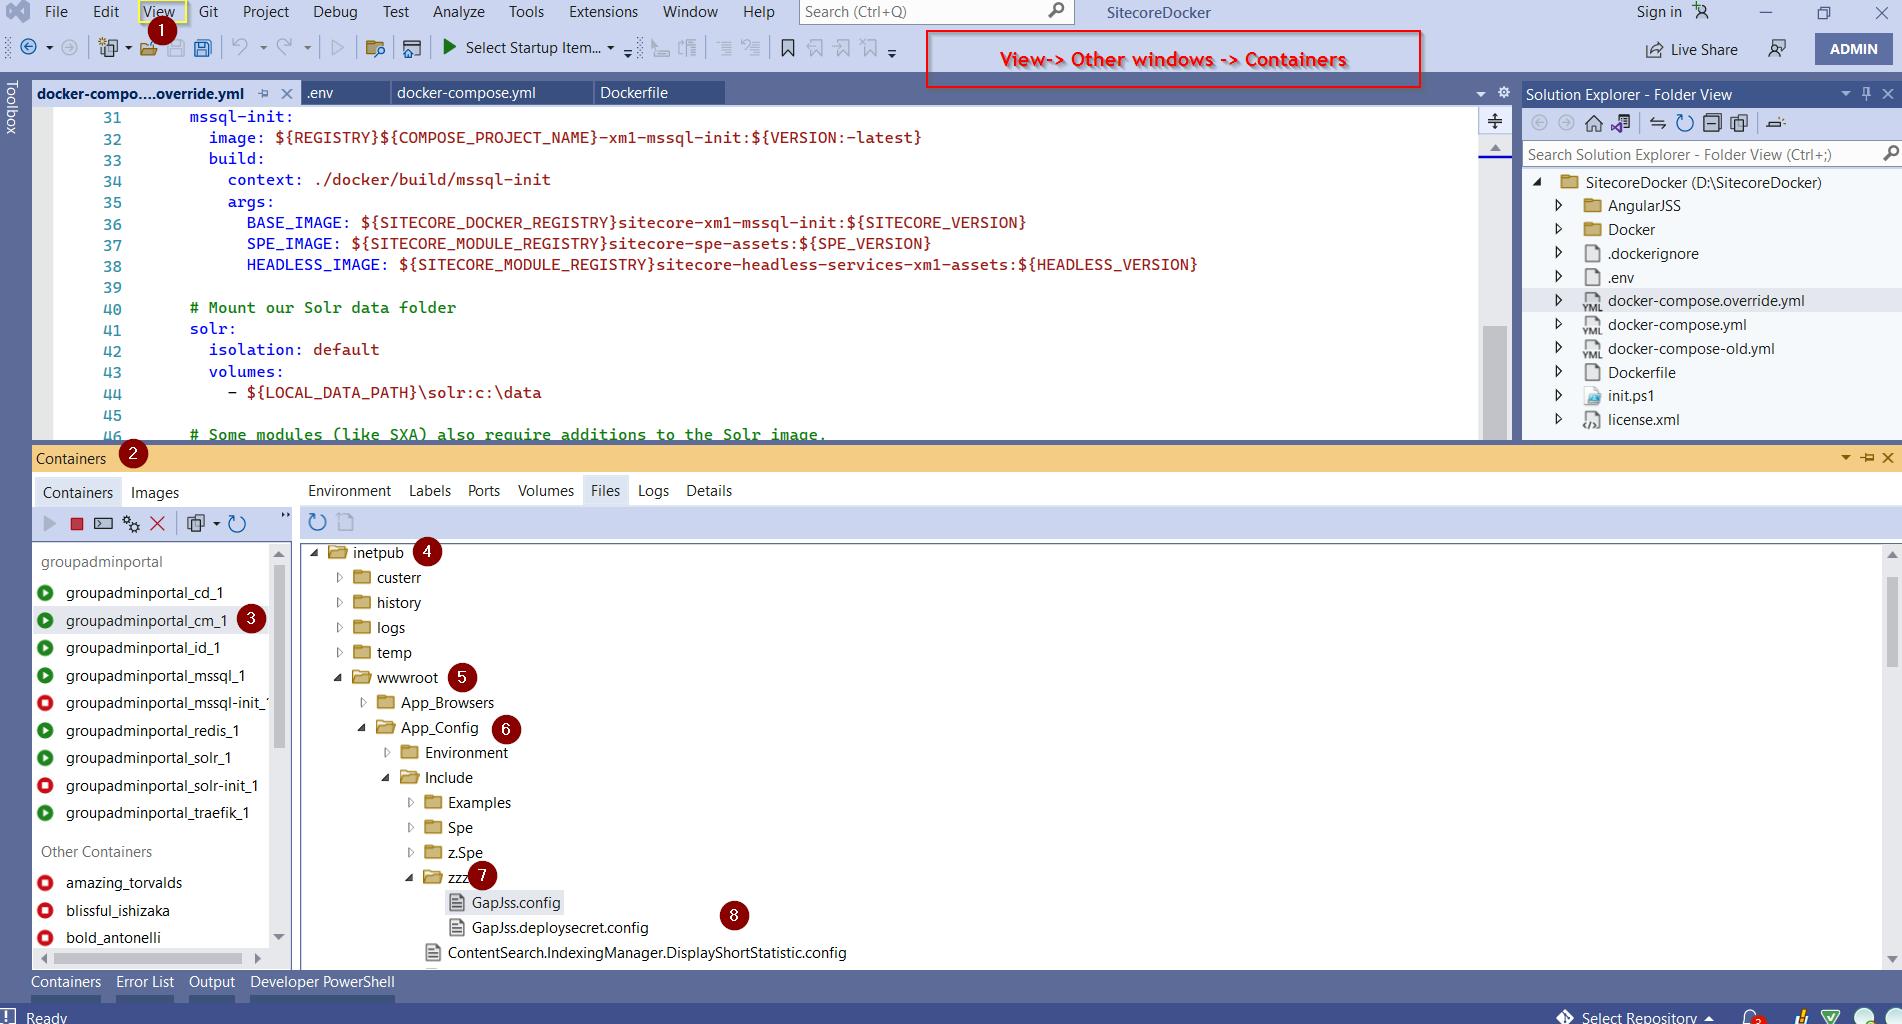
- Verify that the files are in the deploy watch folder
- Verify that the deploy folders are also pushed to the Sitecore docker deploy folder (Go to Visual Studio 2022 and select from menu ViewàOther windowsà This will show the docker containers, files, mappings, labels, ports as below)
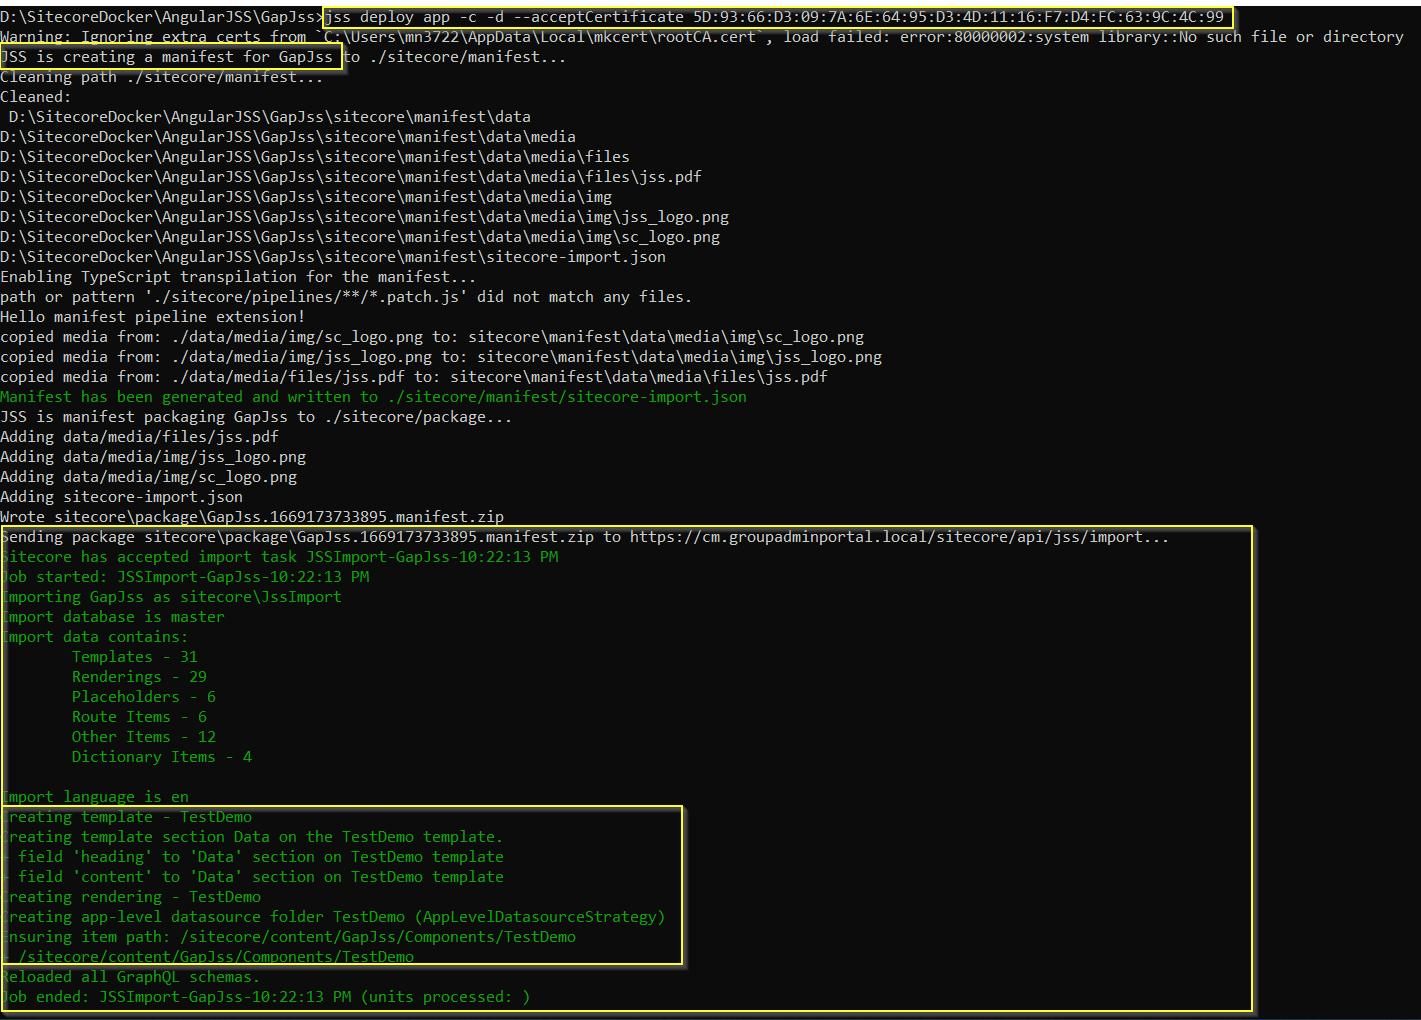
- Now execute to deploy the app–
jss deploy app -c -d –acceptCertificate 5D:9F:00:D2:61:E4:A6:5B:F2:9C:60:98:B3:D6:1E:4C:56:58:34:BB
- Above command deploys the app JSS Angular App to Sitecore docker
- 5D:9F:00:D2:61:E4:A6:5B:F2:9C:60:98:B3:D6:1E:4C:56:58:34:BBis the thumbprint of the certificate on which Sitecore docker is running
- A nice way to get the correct certificate tumbprint is to type this (lol)– jss deploy -c -d –acceptCertificate blahblahblah
- It will complain that you gave a wrong cert name and will give you the correct cert name
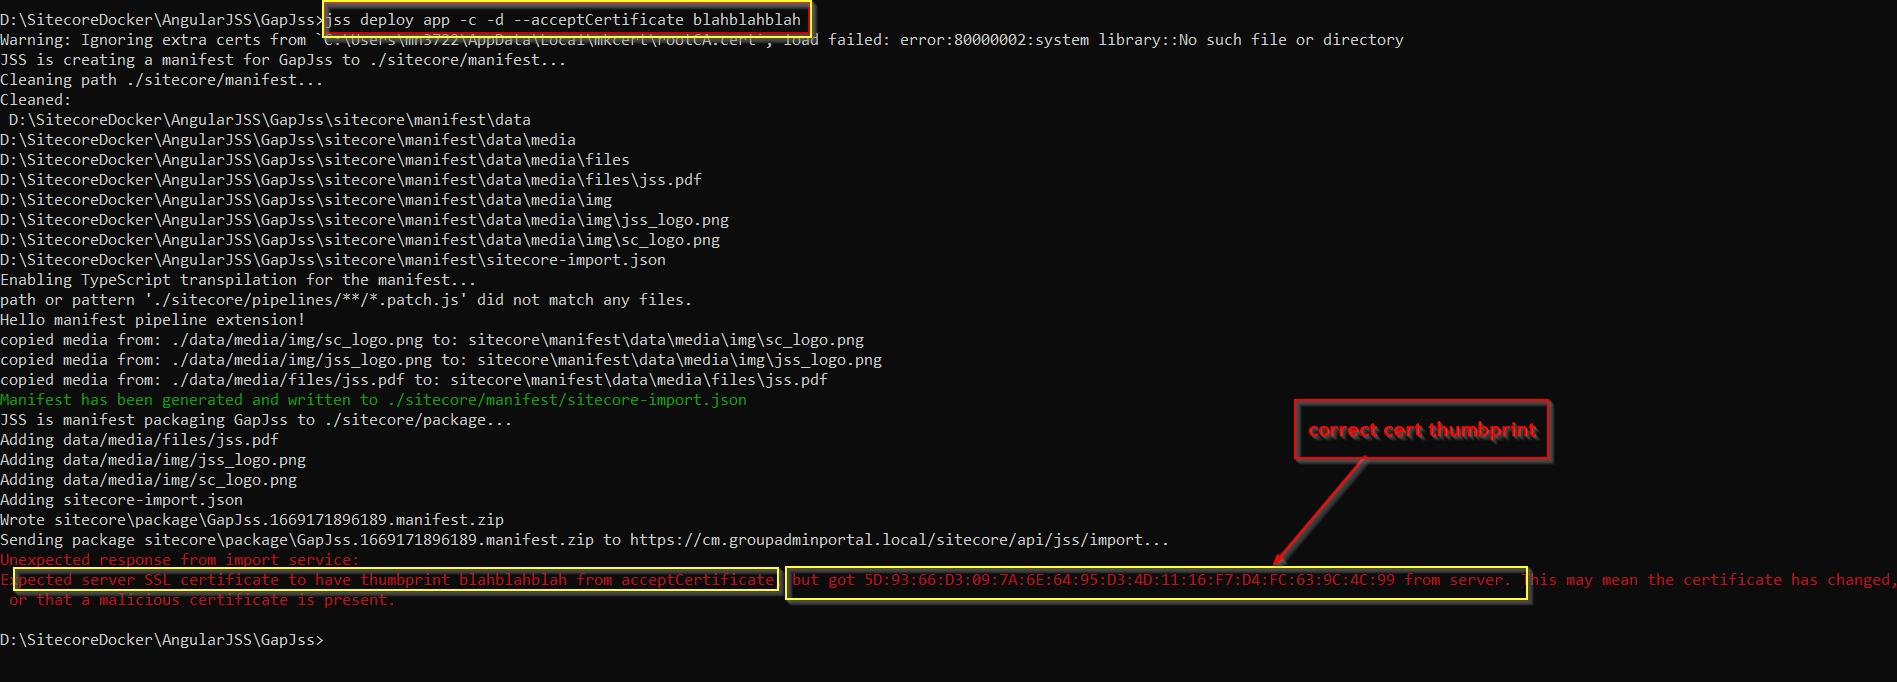
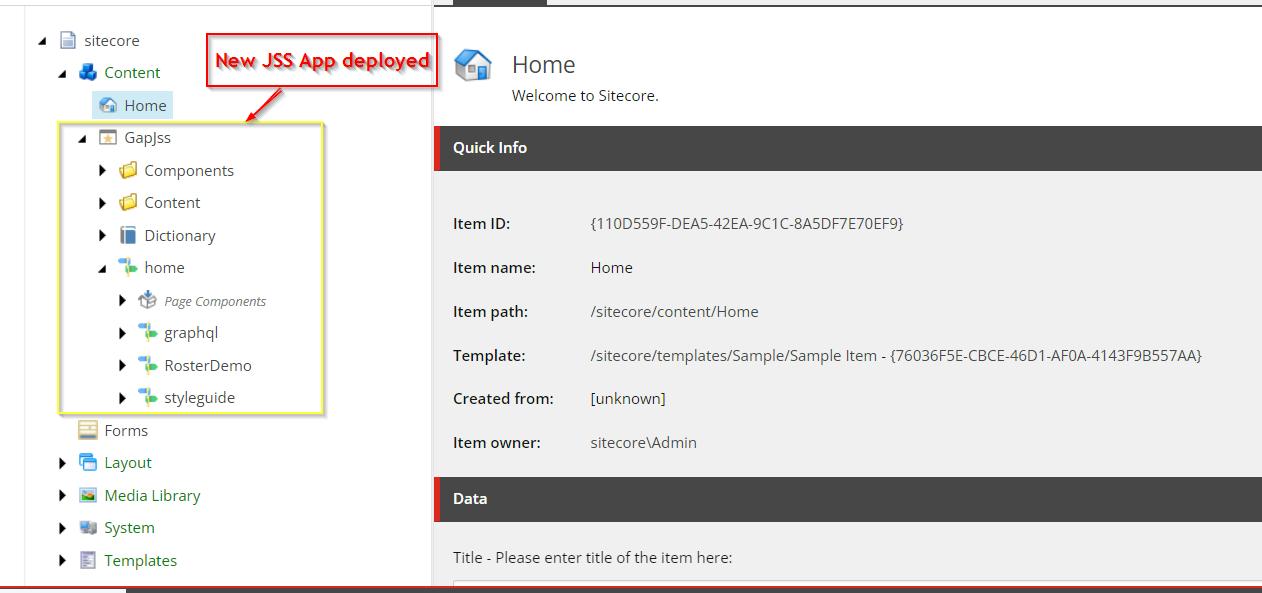
- When executed with correct certificate you will see that Angular JSS successfully connects and deploys the app to Sitecore
- Verify it in Sitecore:
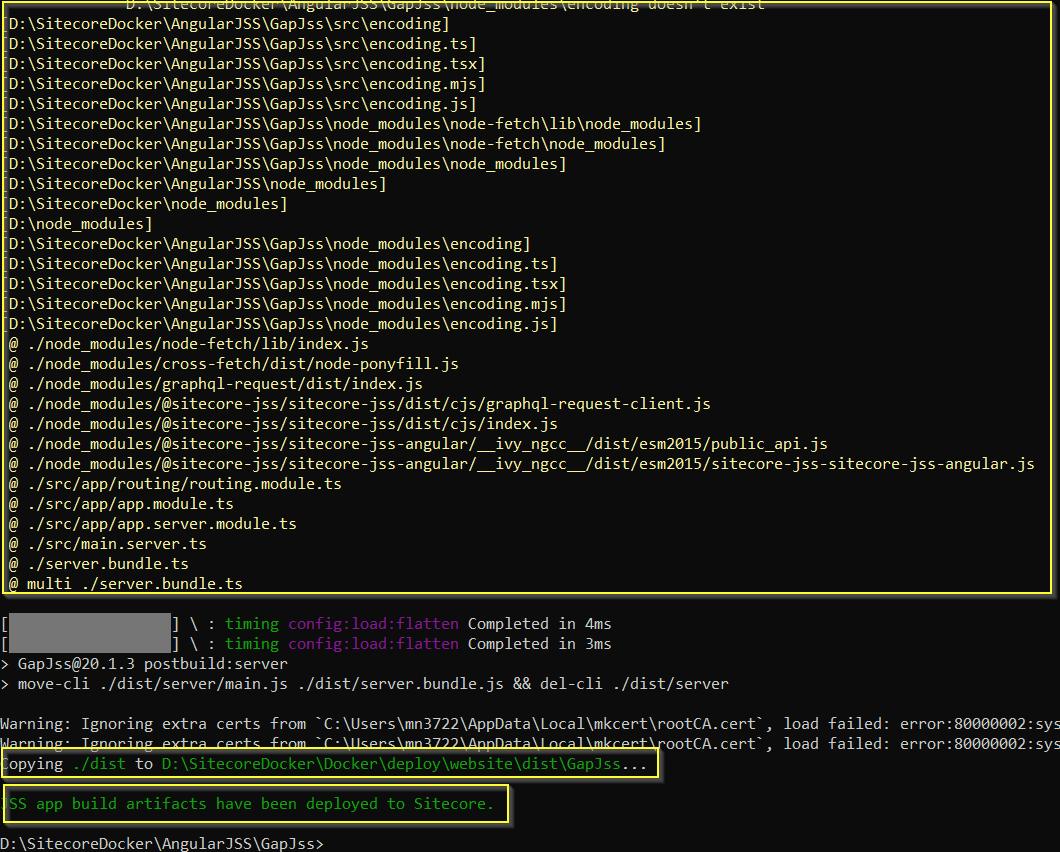
- Then execute to connect the JSS Angular App to Sitecore docker – jss start:connected, on successful execution it will show below message
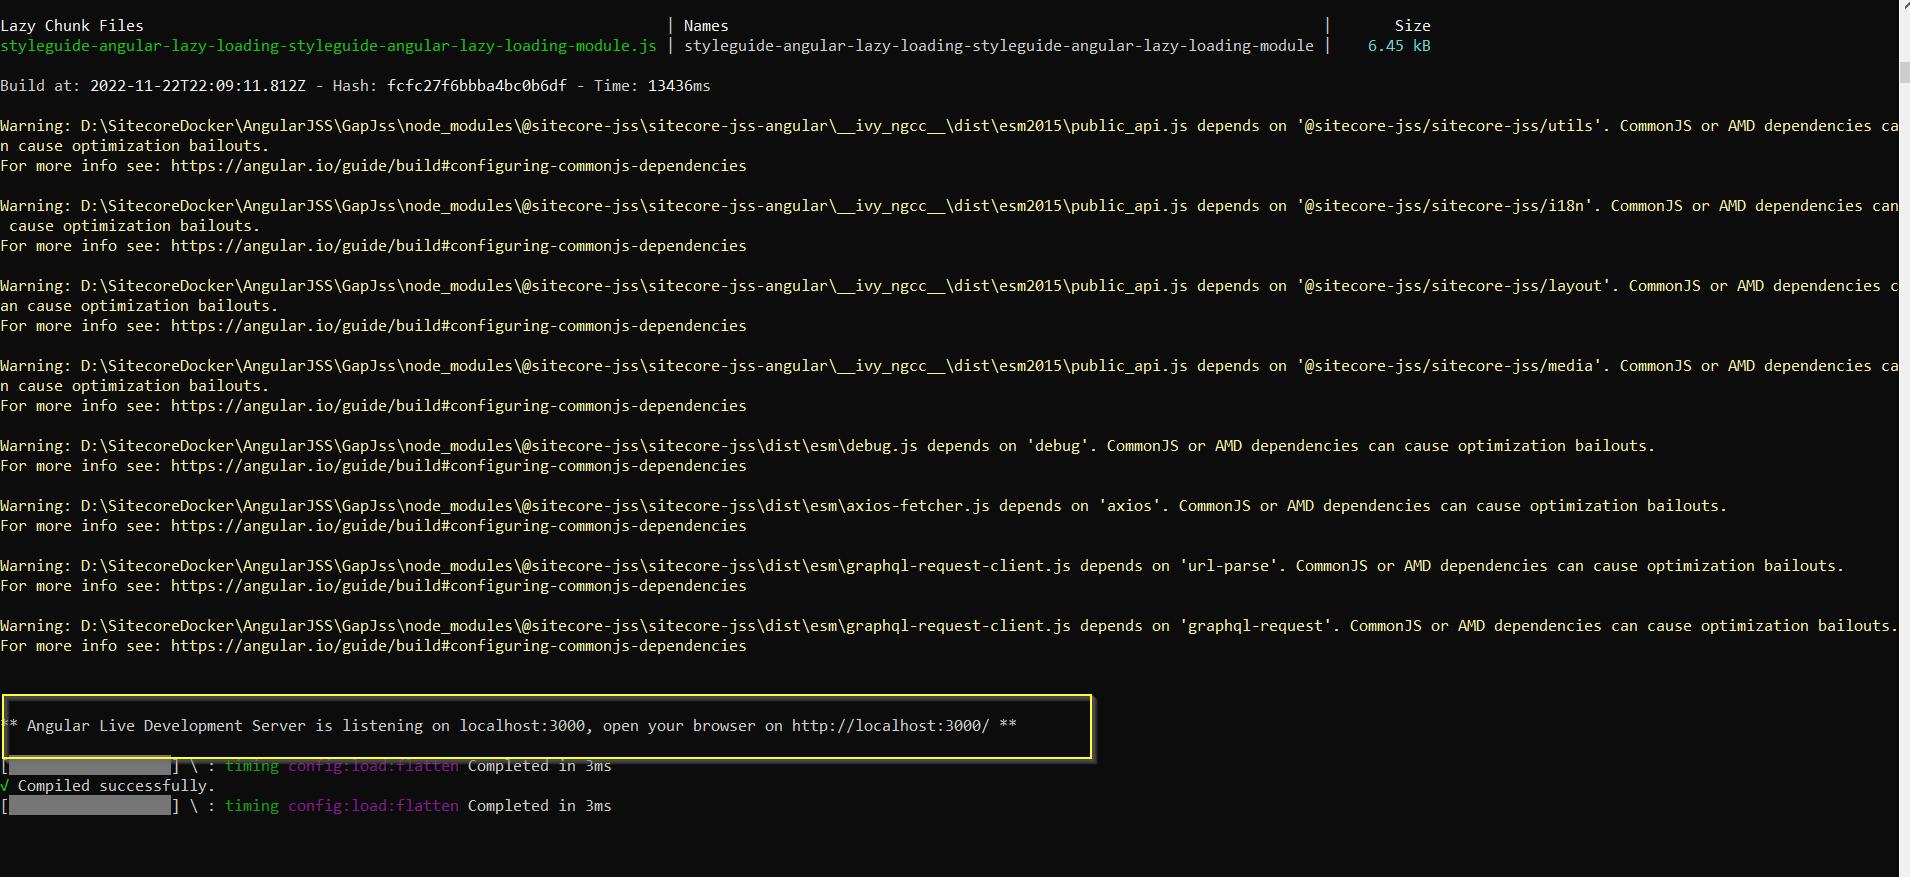
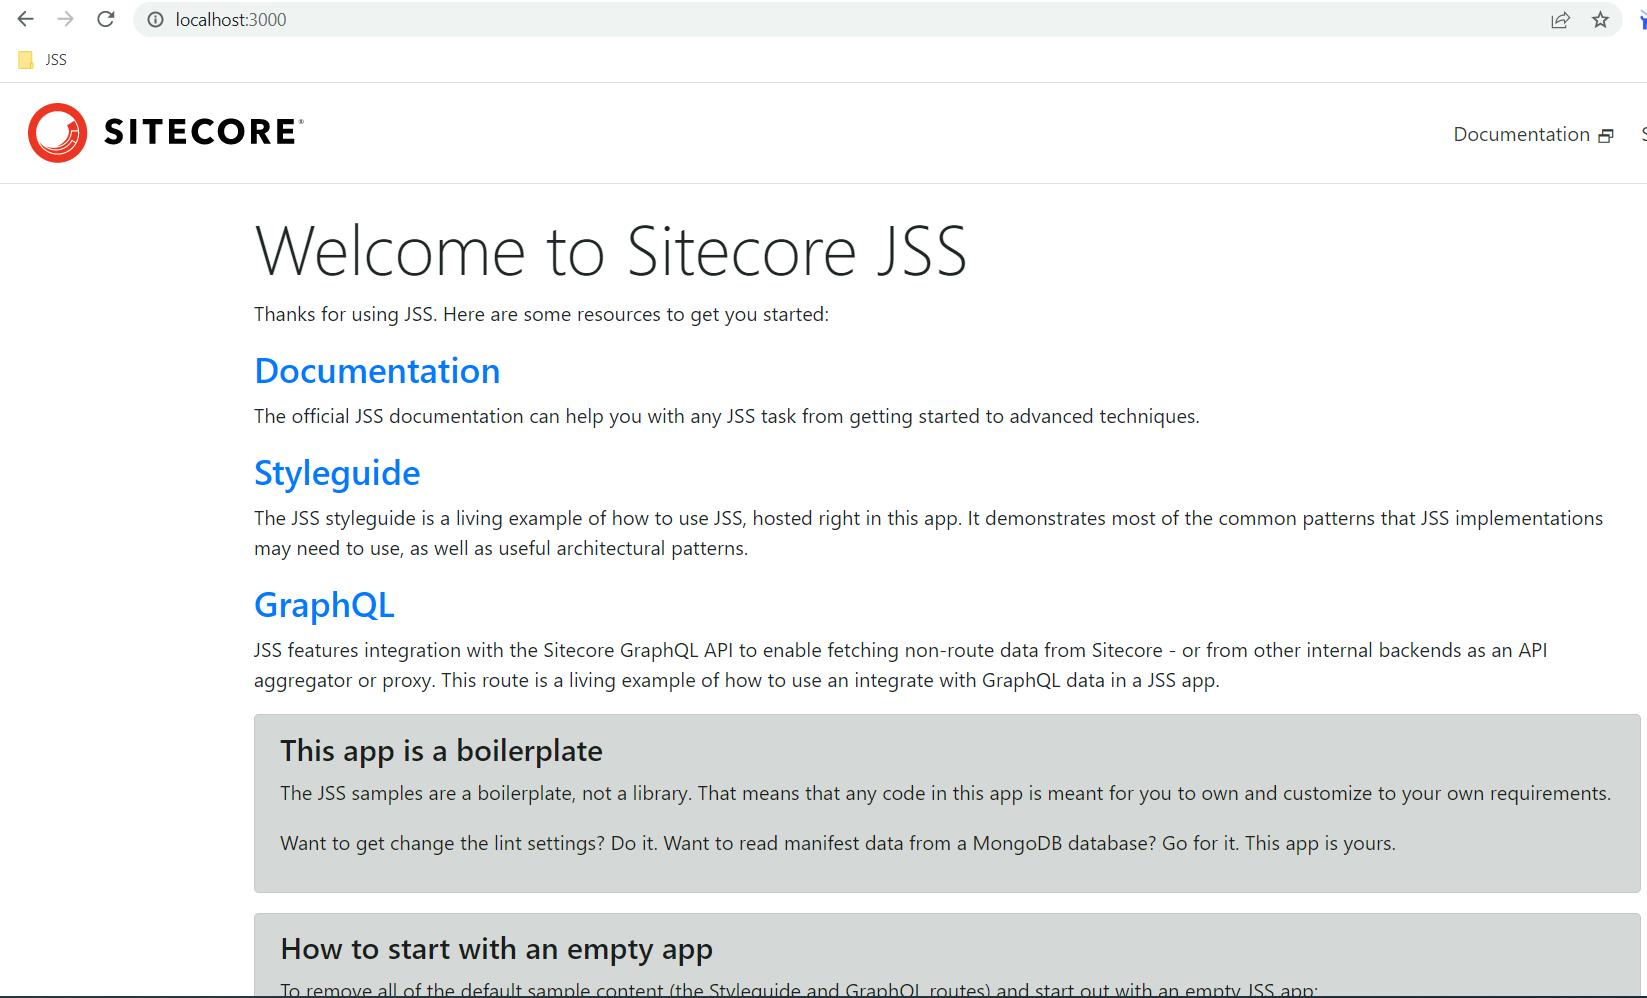
- On successful deploy and run of the JSS App, you will see the following screenshot. Bravo!!!, Successfully deployed Angular JSS running with Sitecore docker in connected mode
- Create a sample component (Code First Workflow):
- Go to the root of Angular JSS application in Visual Studio Code(e.g. D:\SitecoreDocker\AngularJSS
- Create an Angular JSS Scaffoldingcomponent
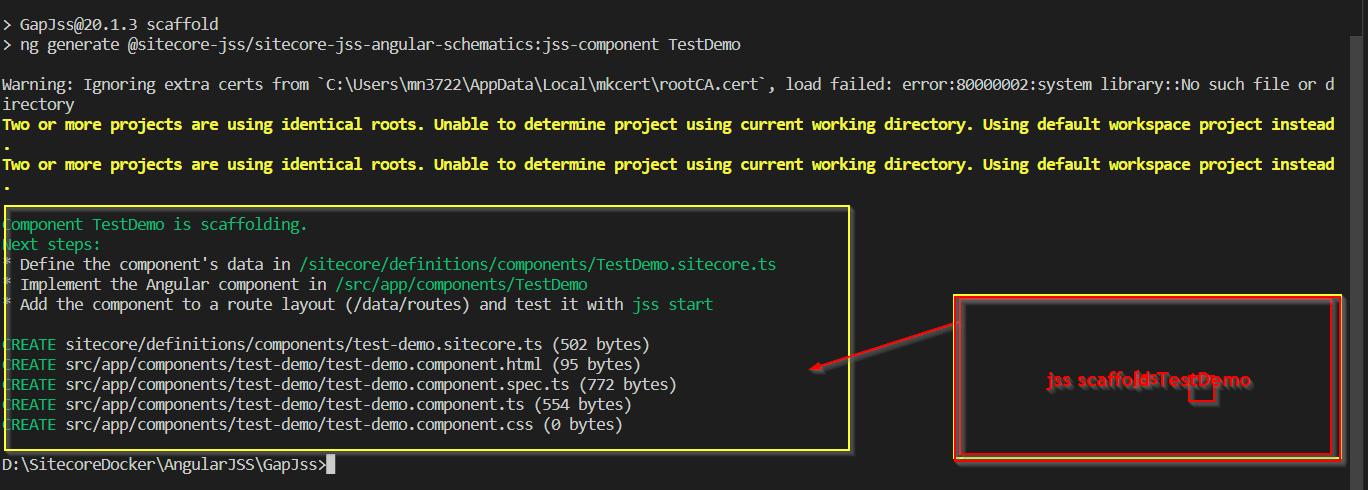
- Execute command to create a component TestDemo- jss scaffold TestDemo
-
- It creates the TestDemo componentand provides the next Steps Instructions
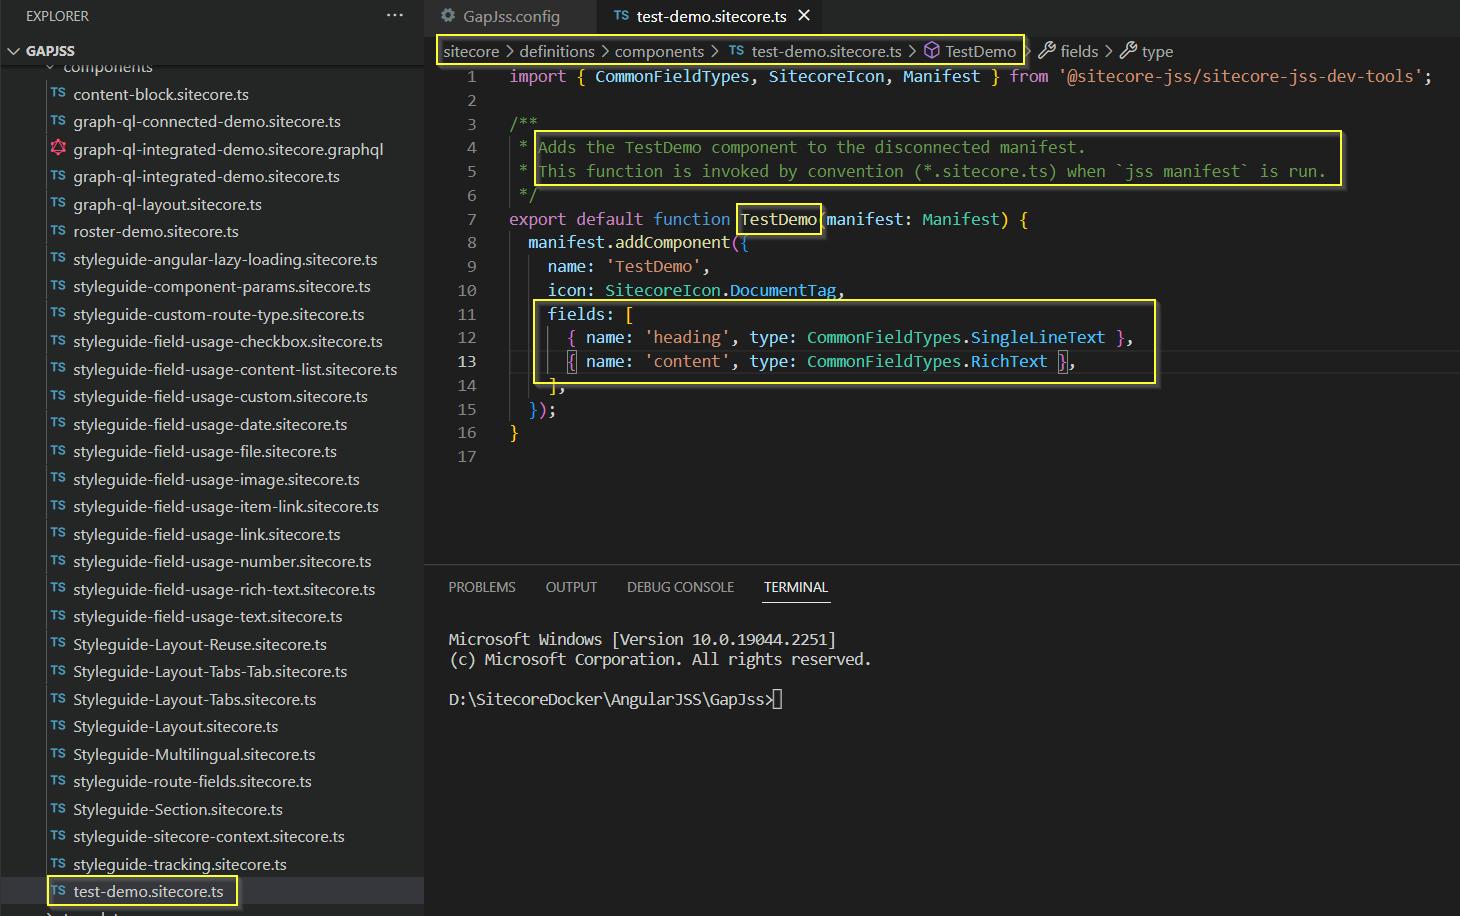
Component TestDemo is scaffolding.
Next steps:
Define the component's data in /sitecore/definitions/components/TestDemo.sitecore.ts
Implement the Angular component in /src/app/components/TestDemo
Add the component to a route layout (/data/routes) and test it with jss start
CREATE sitecore/definitions/components/test-demo.sitecore.ts (502 bytes)
CREATE src/app/components/test-demo/test-demo.component.html (95 bytes)
CREATE src/app/components/test-demo/test-demo.component.spec.ts (772 bytes)
CREATE src/app/components/test-demo/test-demo.component.ts (554 bytes)
CREATE src/app/components/test-demo/test-demo.component.css (0 bytes)
- Contents of sitecore\definitions\components\test-demo.sitecore.ts
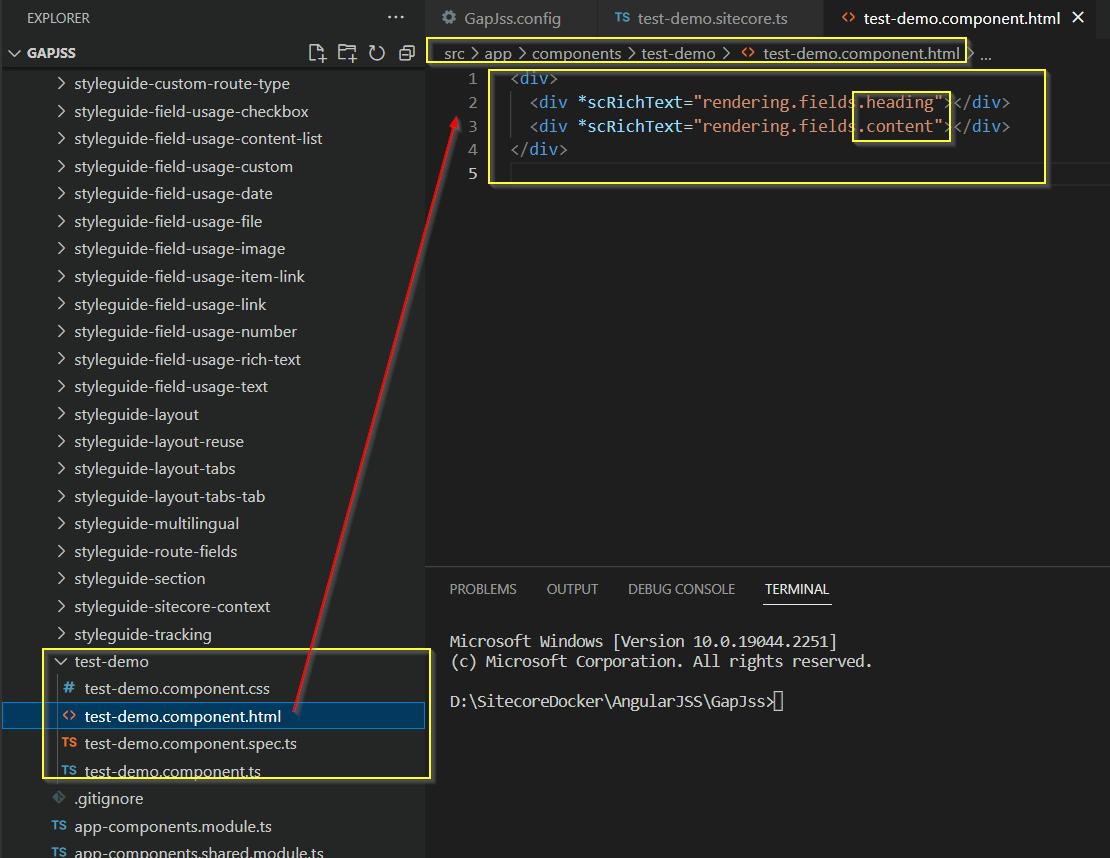
- Contents of src\app\components\test-demo\test-demo.component.html
- Now deploy the above TestDemo component – jss deploy app -c -d –acceptCertificate 5D:9F:00:D2:61:E4:A6:5B:F2:9C:60:98:B3:D6:1E:4C:56:58:34:BB
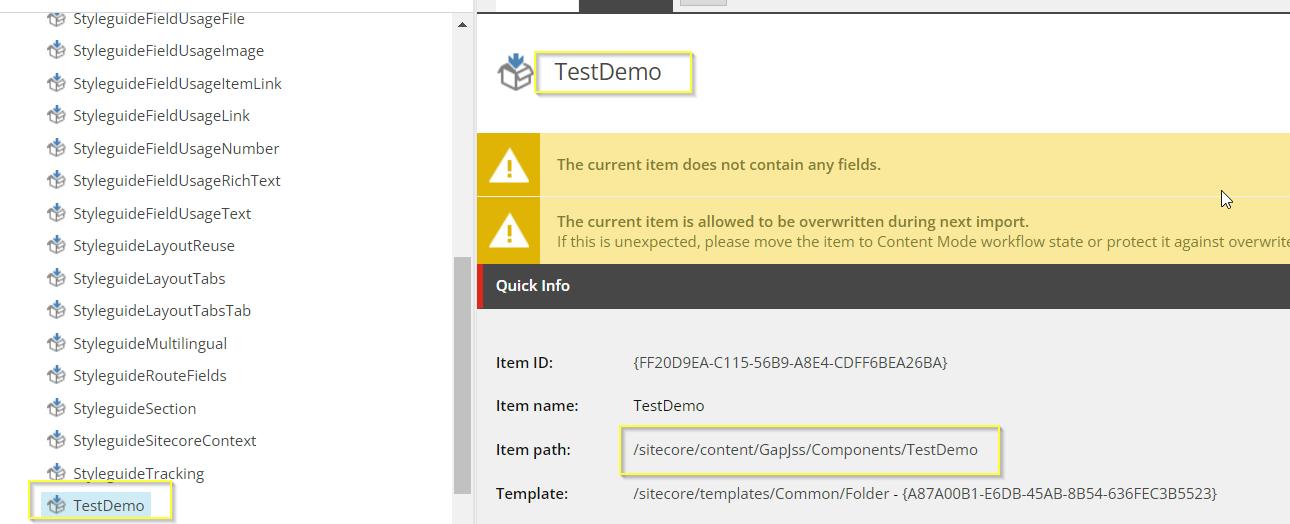
- Verifythe component in Sitecore
- Now Create a Page in Sitecore, Add the required TestDemo Component, define the placeholder and data source
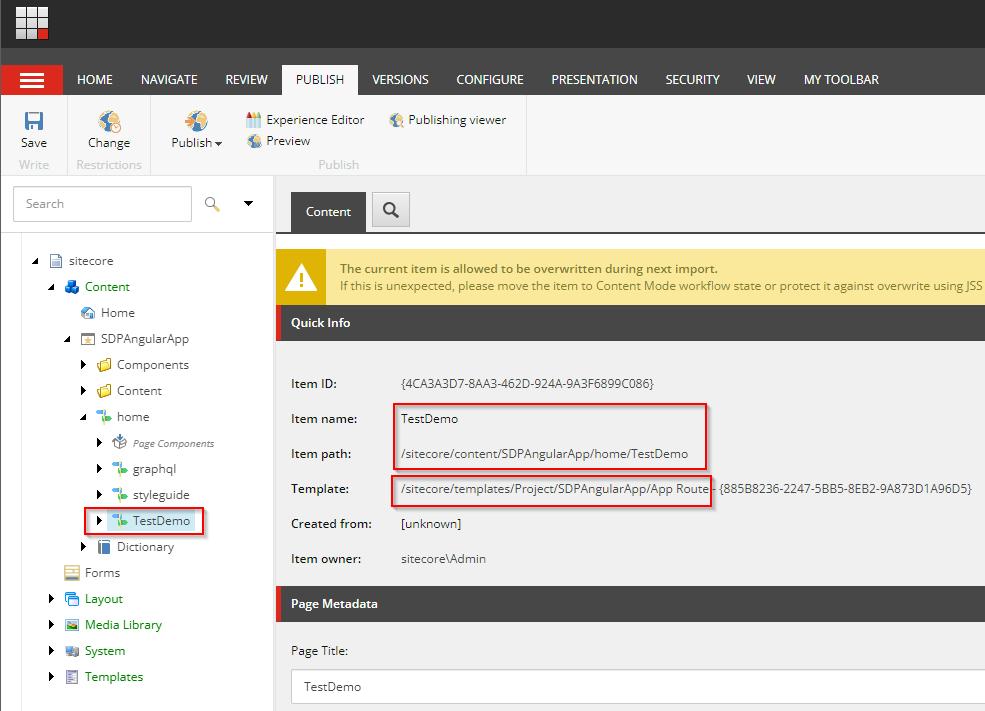
- Create a Page from AppRoute template
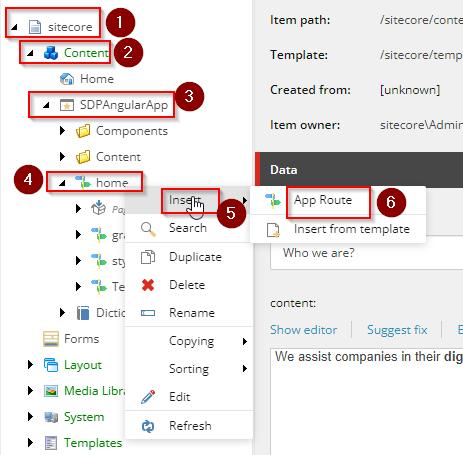
- Once created you will see it like
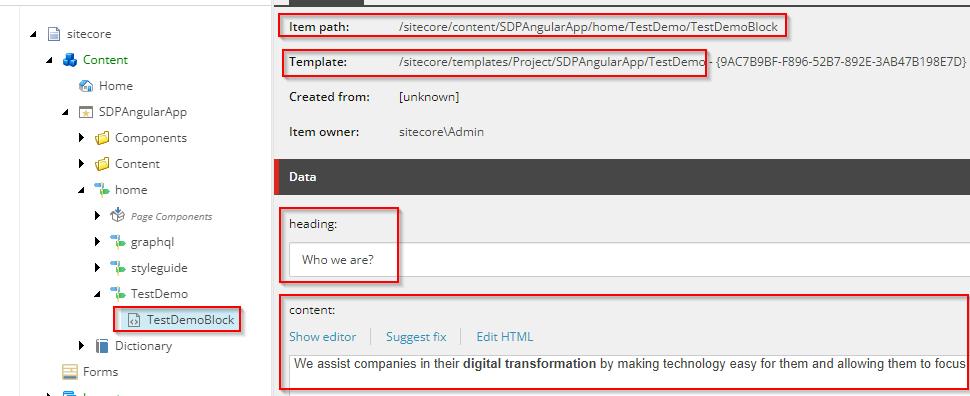
- Add The TestDemo component block for add the heading and the content
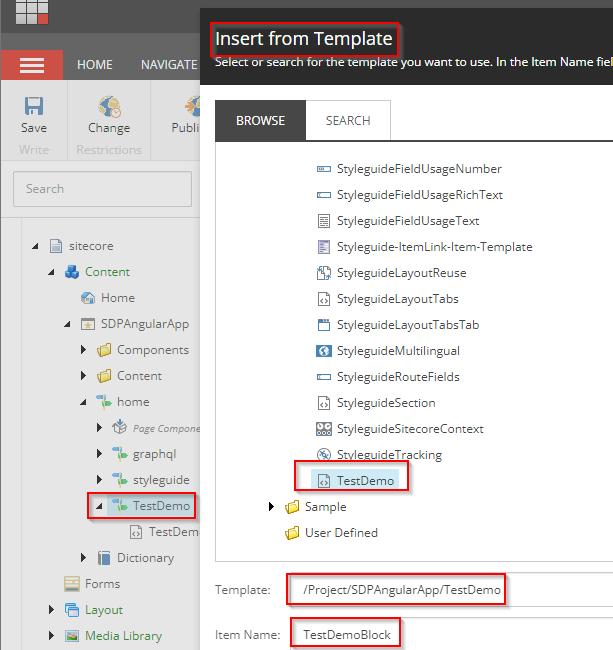
- Once created you will see like this, please enter the heading and content fields
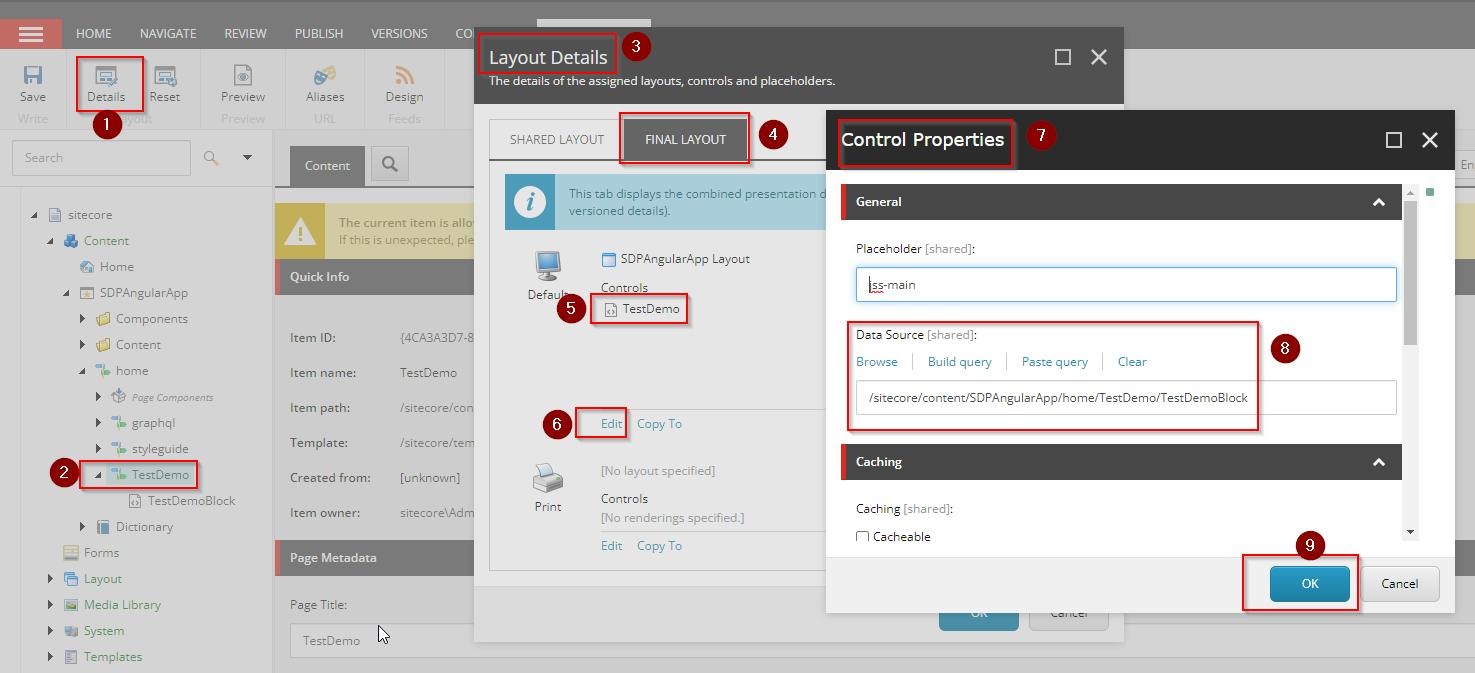
- Add PresentationDetails, add control/component, add placeholder
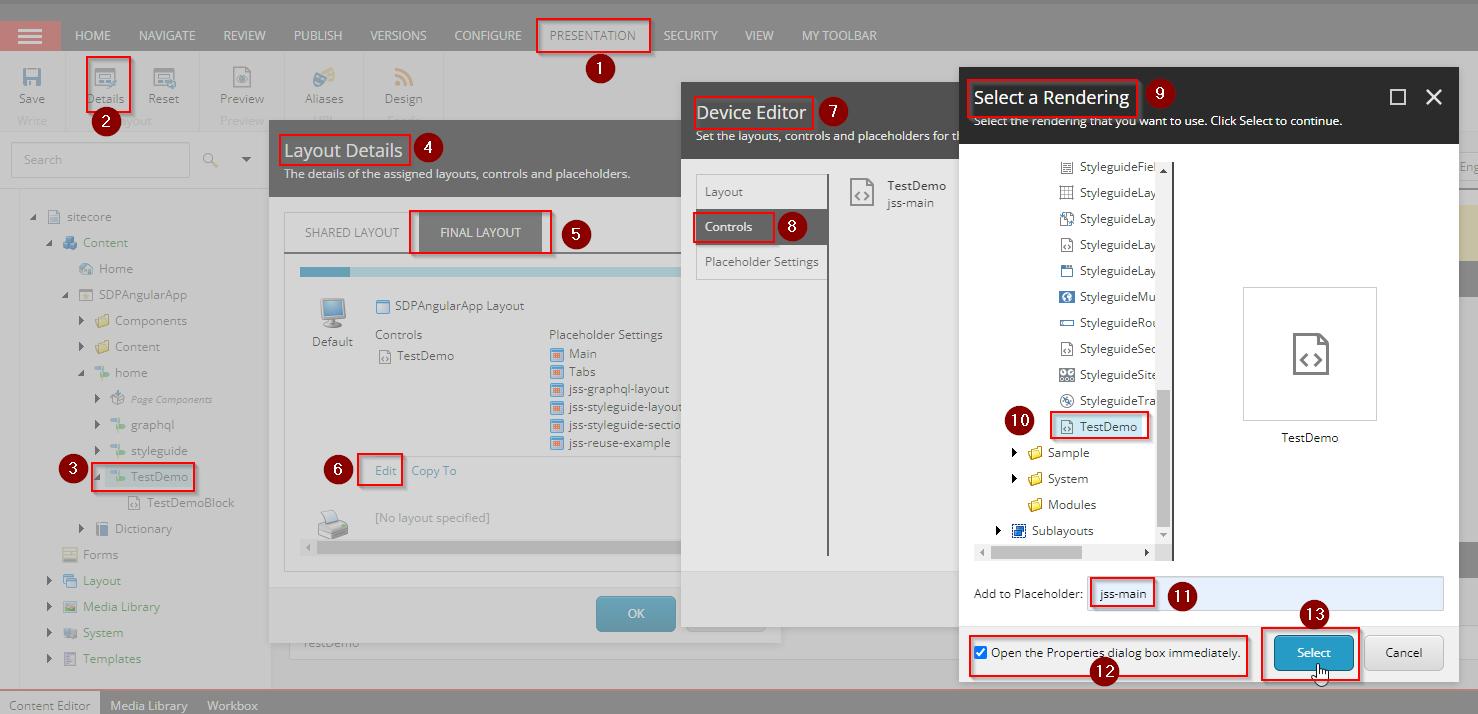
- Add the datasourceto this page as below
- Save and Publish
- Run and testnew Page TestDemoPage –
- Run: jss start:connected
- Execute in browser: http://localhost:3000/TestDemo
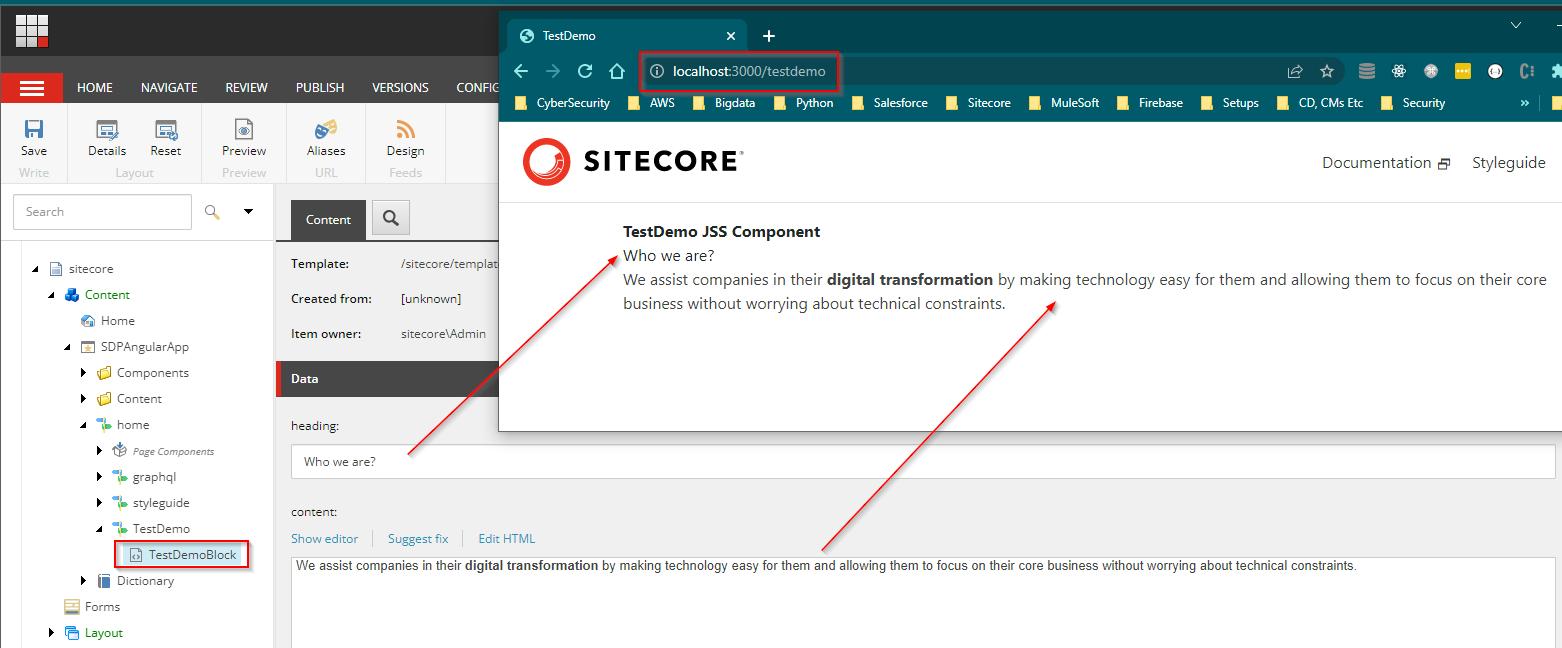
Hurray, you have created a "Code First TestDemo component in Angular JSS, deployed it to Sitecore and then created a Page using that component
- Create a sample component (Sitecore First Workflow):
- How to create JSS component using SFA.
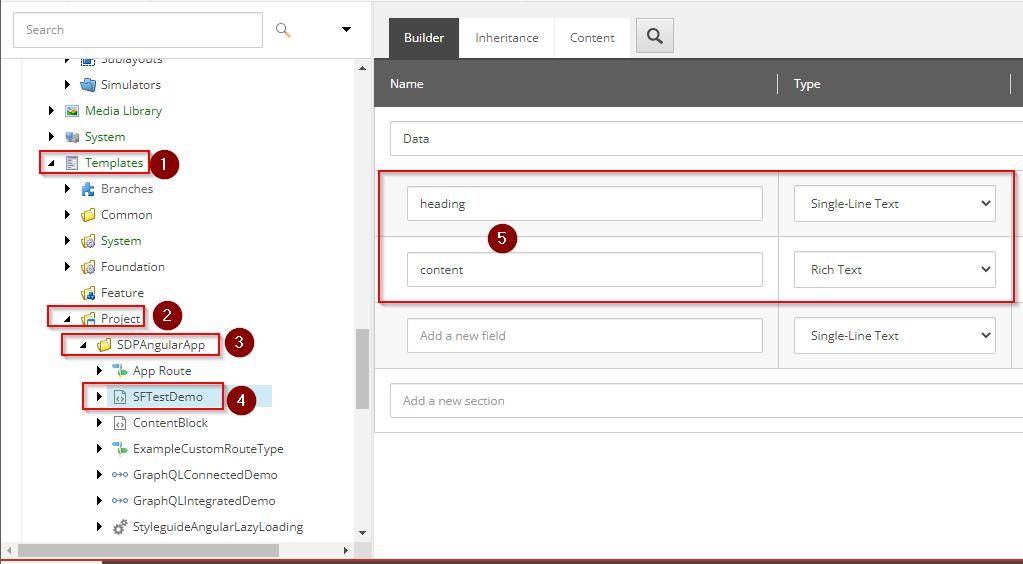
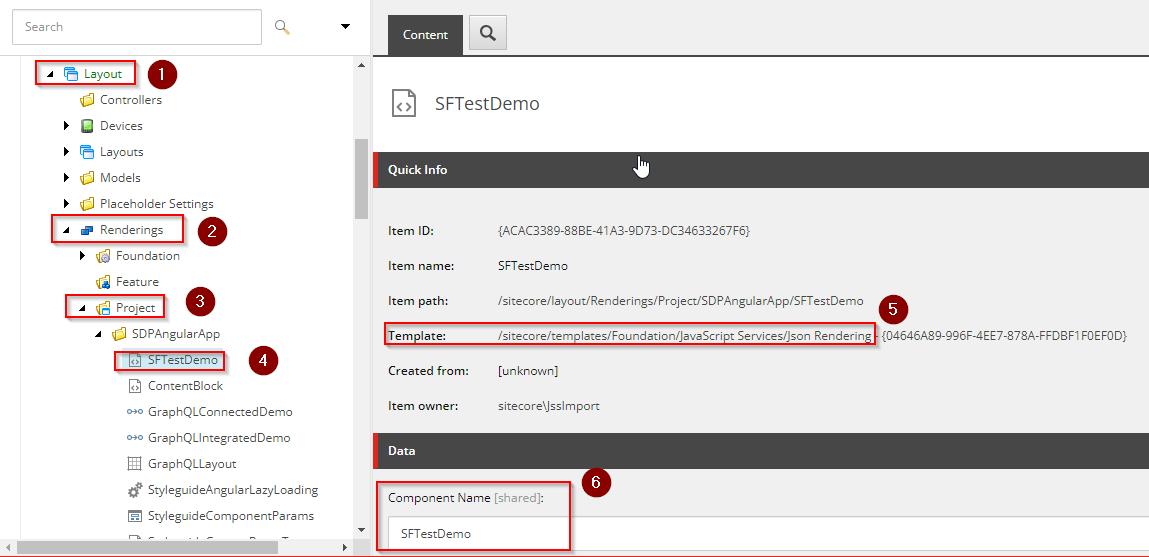
- Create a template in Sitecore
- Create a JSON rendering in Sitecore (Sitecore\content\Layout\rendering)
Open Visual Studio Code
- Go to src\app\componentsFolder
- Create a folder (e.g., SFTestDemo)
- Create 3 filesas below
- First is the component registration file .ts extension this name must match the template name in Sitecore
(sitecore\definitions\components\sftestdemo.sitecore.ts)
import from '@sitecore-jss/sitecore-jss-dev-tools';
/**
* Adds the SFTestDemo component to the disconnected manifest.
* This function is invoked by convention (*.sitecore.ts) when `jss manifest` is run.
*/
export default function SFTestDemo(manifest: Manifest)
- Then come the second file which implements the above component .ts extension
(src\app\components\SFTestDemo\ SFTestDemo.component.ts)
import from '@angular/core';
import from '@sitecore-jss/sitecore-jss-angular';
@Component()
export class SFTestDemoComponent implements OnInit
- and finally comes the .htmlextension
(src\app\components\ SFTestDemo\SFTestDemo.component.html)
This renders the registered component to the HTML file
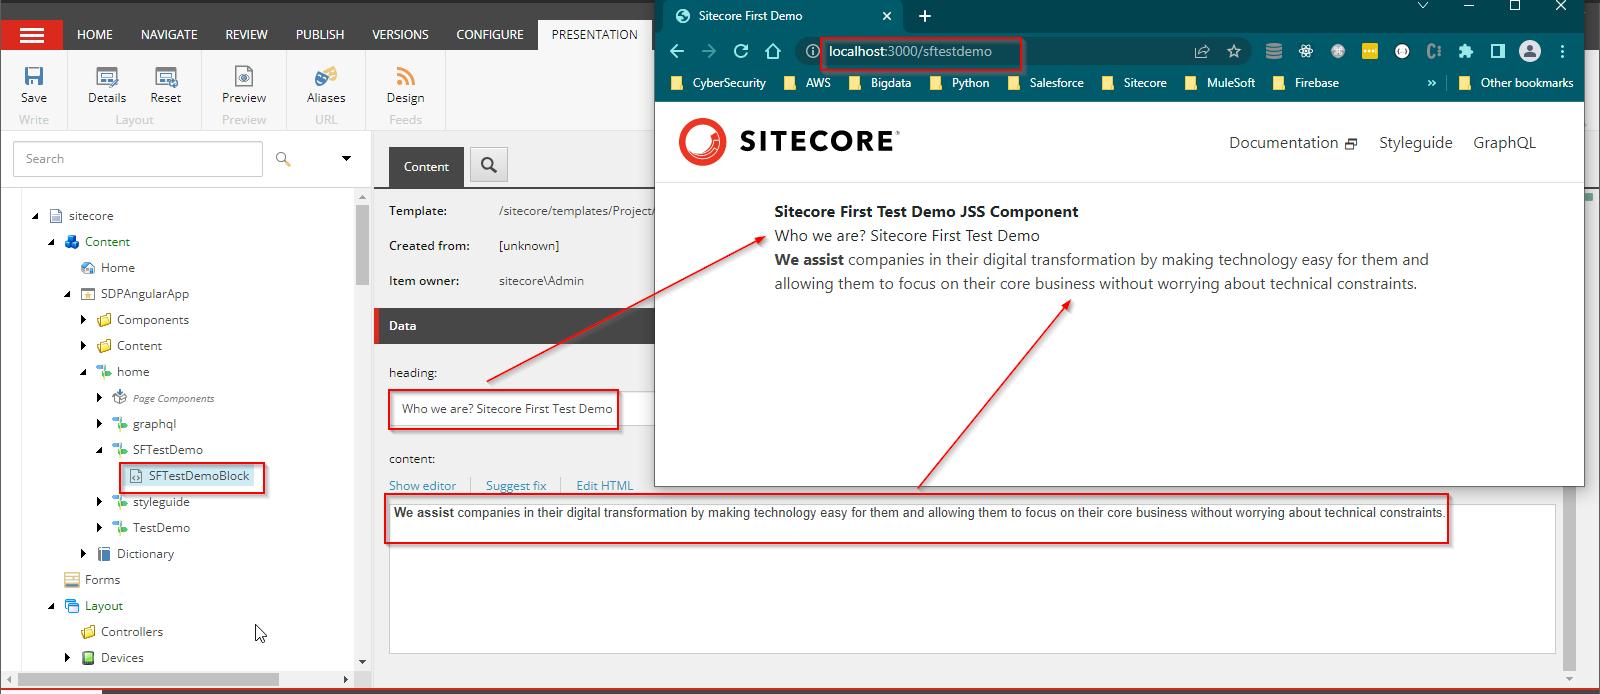
- Save the above files and run the jss deploy -c -d –acceptCertificate command and then jss:start:connected command to sync the changes between Sitecore and Angular JSS app.
Now, create a page into Sitecore using app route
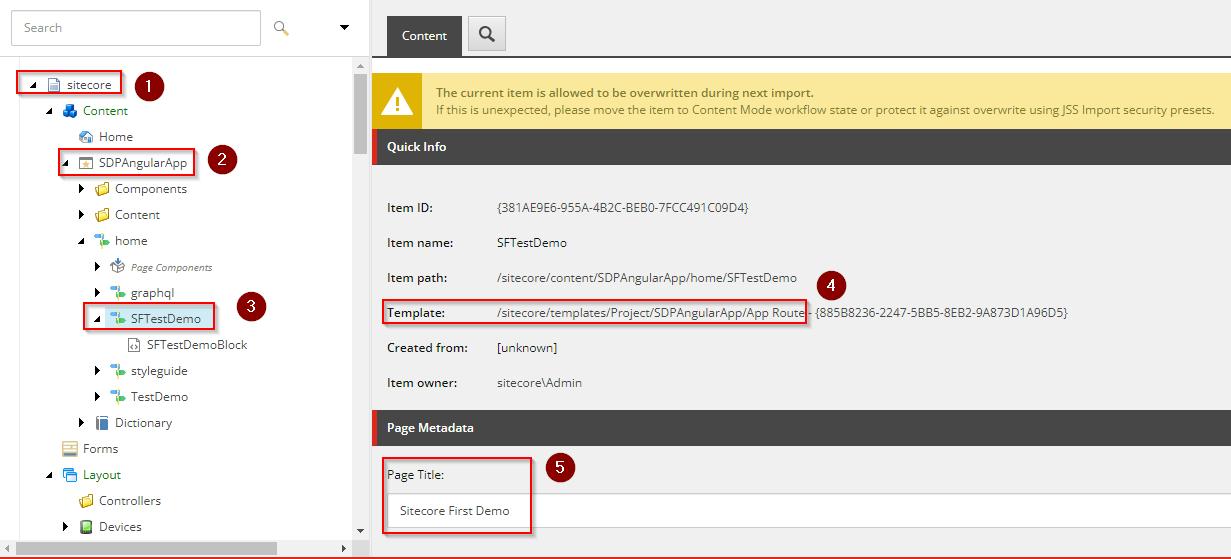
- Create its data source
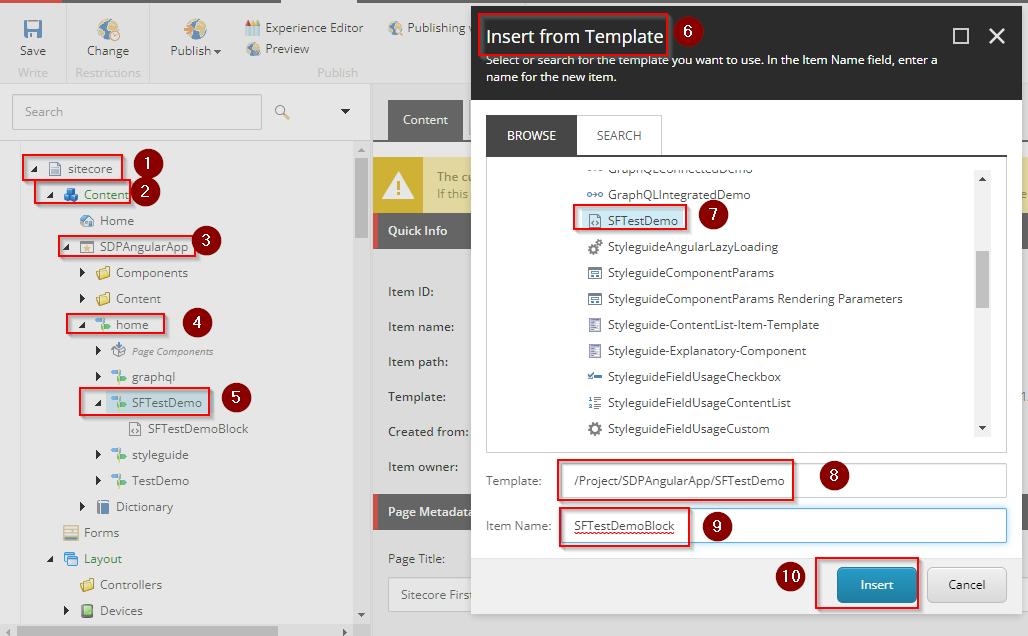
- Assign the presentation details and data source

- Both file name will same as rendering name but only need to add ". component" (e.g. sfdemoblock.component.ts or html)
- Deploy and run the app: http://localhost:3000/sftestdemo
References:
- Sitecore Headless and Angular JSS Setup
- https://doc.sitecore.com/xp/en/developers/hd/200/sitecore-headless-development/publish,-run,-and-test-the-getting-started-template-projects.html– for creating the JSS Angular App
- https://adrianliew.wordpress.com/2021/11/05/deploying-a-sitecore-9-3-jss-angular-app/– Angular JSS app in 9.3
- https://dev.sitecore.net/Downloads/Sitecore_Experience_Platform/102/Sitecore_Experience_Platform_102.aspx– Container Deployment Package
- https://madhuanbalagan.com/tag/sitecore-installand https://buoctrenmay.com/2021/12/02/sitecore-xp-10-2-initial-release-installation-docker-way/ – Sitecore docker install tutorial

Leave A Comment